Disclosure: WorkWise is reader-supported. When you buy through links on our site, we may earn an affiliate commission at no extra cost to you. Learn more.
You don't need a studio to start a podcast. You don't even need a closet full of foam. A dedicated podcasting corner — a small, treated space in your existing home office — will get you 90% of the way to professional sound for under $500 and a single afternoon of setup. Here's how we'd build it from scratch.
Why a "corner" beats a "studio"
Most people who try to set up a podcasting space try to build a studio: heavy acoustic treatment, a dedicated room, soundproof doors. That's overkill for 95% of podcasters. What you actually need is:
- A quiet enough room (no traffic, no constant HVAC).
- A microphone that rejects noise from the back and sides.
- A chair / desk setup where you sit consistently in the same spot.
- Just enough acoustic treatment to kill the worst room reflections.
That's it. A "corner" gives you all four. Let's break it down.
Step 1: Pick your corner
The best corner has three properties:
- Soft surroundings — carpet, curtains, a bookshelf, a couch. These absorb sound naturally.
- Away from windows — glass reflects sound and lets traffic in.
- Away from hard parallel walls — that's where "boxy" echo lives.
If you only have a square room with hard walls, that's fine — we'll fix it with light treatment in Step 4.
Step 2: Choose your microphone
The single biggest decision. There are three real options for podcasting:
USB dynamic mic (~$60–$130)
For solo podcasters and beginners. Plugs straight into your computer, no audio interface needed. Dynamic (not condenser) is what you want — dynamic mics reject room noise and only pick up sound that's very close, which means your untreated room sounds dramatically better than it would with a condenser.
FIFINE K669B USB Dynamic Mic
Under $50, sounds like a $200 mic, and the cardioid pattern means it ignores your room. The hands-down best "I just want to start podcasting" mic in 2026.
Check price on AmazonUSB + XLR dynamic mic (~$250)
The upgrade path. Use USB now, add an audio interface later when you want better quality or multiple mics.
Shure MV7+
The "buy once" podcasting mic. Used by everyone from solo podcasters to Joe Rogan-tier setups. Touch panel, USB-C and XLR, built-in DSP. Worth the money if you're serious.
Check price on AmazonXLR dynamic + audio interface (~$400)
The classic radio sound. The Shure SM7B is the legendary mic in this category, but it needs a beefy preamp.
Shure SM7B + Cloudlifter CL-1 + Focusrite Scarlett Solo
The full pro chain. ~$400 for the SM7B, ~$150 for the Cloudlifter (boosts the weak signal), ~$120 for the interface. This is the sound of every podcast you've ever loved.
Check price on AmazonStep 3: Get the mic in the right place
This is what 90% of beginner podcasters get wrong. Your mic should be:
- 4–6 inches from your mouth. Closer is better with dynamic mics.
- Slightly off-axis — point it at the corner of your mouth, not straight at it. This eliminates "plosives" (the popping P sound).
- On a boom arm, not the included desk stand. The desk stand transmits keyboard typing through the surface; a boom arm decouples it.
- With a pop filter or foam windscreen. A $10 foam windscreen does 80% of the job.
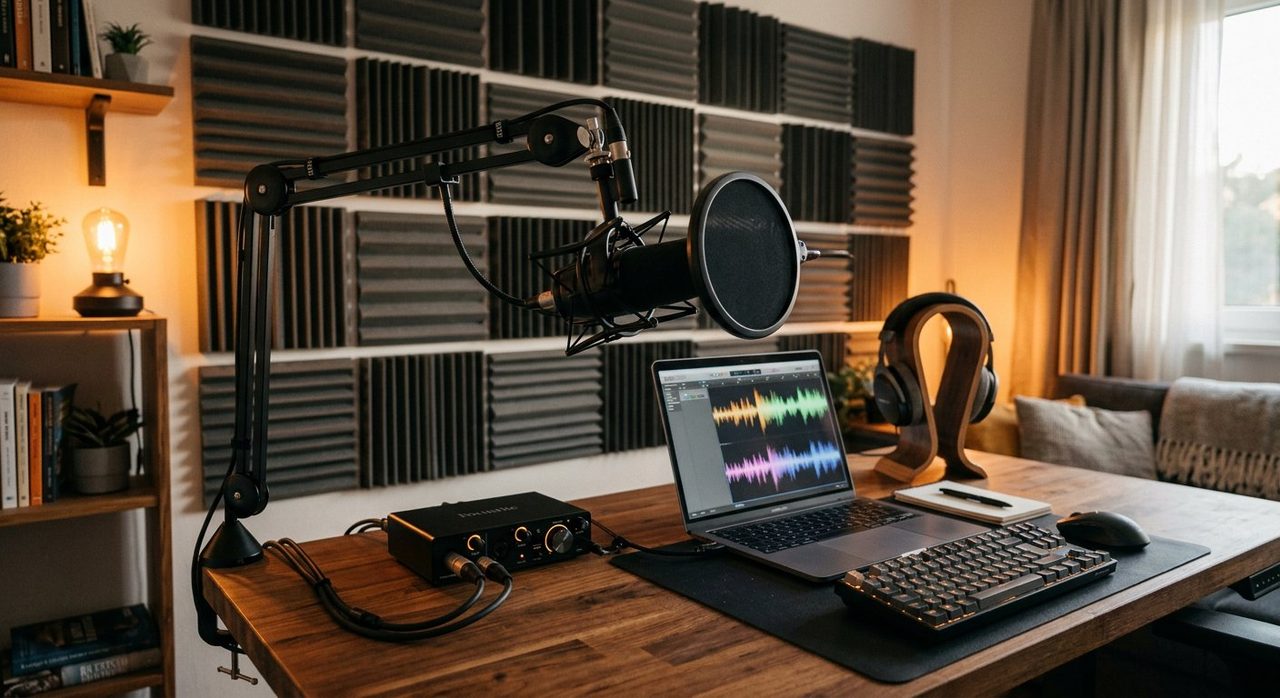
InnoGear Heavy Duty Microphone Boom Arm
Cheap, sturdy, holds even an SM7B. The right $40 to spend.
Check price on AmazonStep 4: Tame the room
The goal is not to make your room sound dead. It's to absorb the worst slap-back echo so your voice sounds like it's in a normal room, not a cave.
The cheap way: hang a thick blanket or duvet behind you, on the wall the mic is pointing toward. That's the wall picking up your voice's reflection. One blanket can transform the sound.
The slightly-less-cheap way: 6–8 acoustic foam panels (12"x12", 2" thick) placed strategically:
- 2 panels on the wall behind you (where your voice bounces back at the mic).
- 2 panels on the ceiling directly above your mic.
- 2 panels on the wall opposite a parallel wall (kills standing waves).
Acoustic Foam Panel Pack (12 panels)
Around $30 for a 12-pack. Self-adhesive or use Command Strips so you don't damage walls.
Check price on AmazonWhat works even better than foam: soft furniture
A bookshelf behind you (irregular surfaces diffuse sound), a couch in the room, thick curtains, a rug on a hard floor. These cost nothing extra and treat the room more naturally than foam.
Step 5: Headphones for monitoring
Closed-back, wired. Open-back leaks audio that your mic picks up. Wireless adds latency.
Audio-Technica ATH-M40x
The standard "starter" studio headphones. Honest sound, no enhanced bass, $99. The M50x is also great if you want a bit more bass for music mixing.
Check price on AmazonStep 6: Recording software (all free)
- Audacity — free, simple, works for solo podcasts.
- Reaper — $60 (or unlimited free trial), industrial-grade DAW. What I use.
- Riverside.fm or SquadCast — for remote multi-person interviews. Records each participant locally for clean audio.
Step 7: A signal-chain template for clean podcast audio
Three plugins / processors will dramatically improve any recording:
- Noise gate — kills the room when you're not speaking. Set the threshold just below your softest speech.
- De-esser — tames harsh "S" sounds.
- Compressor — evens out volume. 3:1 ratio, gentle attack, ~4 dB of gain reduction.
If that's too technical, the Shure MV7+ does all of this in hardware automatically.
A complete podcasting corner kit for ~$400
- Shure MV7+ — ~$250
- InnoGear boom arm — ~$40
- Audio-Technica ATH-M40x headphones — ~$99
- Foam windscreen — ~$10
- Acoustic foam (12-pack) — ~$30
That kit will sound better than 80% of podcasts currently on Spotify. We're not exaggerating.
What to skip
- Condenser mics in untreated rooms. Beautiful in a studio, terrible in a bedroom.
- RGB-everything streaming setups. Mic in shot of a glowing keyboard distracts viewers.
- "Podcast in a box" all-in-one mixer kits. They lock you in and rarely improve quality.
- Soundproofing foam from Amazon labeled "soundproofing." It absorbs, it doesn't soundproof. There's a difference.
Final word
The corner-of-the-room setup beats the dedicated studio for most podcasters, because the studio takes a year to build and you start podcasting today. Get a Shure MV7+ on a boom arm, pin a blanket behind you, and hit record. Six months from now, when you've published 30 episodes, you can decide whether to upgrade.
For everything else about the workspace around this corner — lighting, monitors, the desk it sits on — see our full WorkWise guides.
Frequently asked questions
Do I need a treated room to start podcasting?
No. A corner with soft surroundings (carpet, curtains, bookshelf), a dynamic microphone close to your mouth, and a blanket on the wall behind you produces 80% of pro-studio sound. A full studio is overkill for solo podcasters.
USB or XLR microphone for podcasting?
USB to start (FIFINE K669B is $50 and sounds great). Upgrade to USB-and-XLR (Shure MV7+) when you want to grow. Skip pure XLR + audio interface unless you're going professional.
Why is mic placement so important?
Mic distance is the #1 reason podcasts sound amateur. Your mic should be 4–6 inches from your mouth and slightly off-axis. Most beginners place it 12+ inches away, which forces high gain and brings in room noise.
Do I need acoustic foam to start podcasting?
A blanket on the wall behind you works almost as well for far less money. If you want to upgrade, 6–8 acoustic panels strategically placed are plenty for most home rooms.
What recording software should I use as a beginner?
Audacity is free, simple, and works for solo podcasts. Reaper ($60 with unlimited free trial) is industrial-grade if you want to grow. Riverside or SquadCast for remote multi-person interviews.
Spotted a mistake or want to suggest a product we should test? Get in touch — we read every message.